Sunday, October 25, 2009

An Introduction to Tahquitz Rock

Today, my friend and rock climbing partner Kevin and I found ourselves having to scramble down a steep mountain on our butts literary. I probably had more butt time than Kevin for that matter. Part of it was due to the steep terrain that we found ourselves on. We were on the base of Tahquitz rock, a statuesque monolith of granite rock located above the mountain town of Idyllwild in San Bernardino County, on the western slope of the San Jacinto mountain range.


But there were other reasons besides the steep angles we were dealt with. One main reason being the trails were loosely defined, so we took a what you would call a straight scramble down from the location we had been rock climbing earlier on the rock’s west face. Perhaps yet another reason was that it was the first time we were exploring the rock, so besides carrying a hand written map of the area, a book of Tahquitz rock climbs, we could not really easily identity a traditional trail to and from the mountain, a sentiment shared by another pair of rock climbers at the parking lot who said they always seen to come down a different trail during their climbing sessions there. Well, to be fair, one trail on the hand written map sheet, had a 3.9 mile trail description to our destination, but we were leaning to the trail directions I had downloaded from a rock climbers’ website off the internet that said it would take about 45 minutes to get to from the parking lot to the rocks west face area.

For me, yet another reason was that my Keen sandals, in spite of being impressed for their multi use and descent rock grip and ankle support, did not fair so well scrambling down over loose dirt and rock debris, in addition to dry pine tree needles that covered most of the solid rock base underneath all that. I guess the Keen sport sandal’s wide foot design made it difficult to dig the foot into the soil for additional grip. Needless to say I was slipping and sliding for most of my way down, and trying to get down the mountain before sunset (we finished our climbs and packed up sometime after 4pm.) Ironically, the actual climbs Kevin and I did on the rock’s face earlier turned out to be much more mild than the harrowing scramble descent down the mountain. Both Kevin and I agreed that it would have been much safer and better to have double taken a look at the long way back on the “defined” trail than the option we took, but at least we did manage to get to the parking lot in 45 minutes. Maybe the poster on the rock climbers’ website was right after all. All in all, I did take a couple of spills, but I felt limber and with quick reflexes, and obviously only suffered external scratches, but got down safely and injury free.

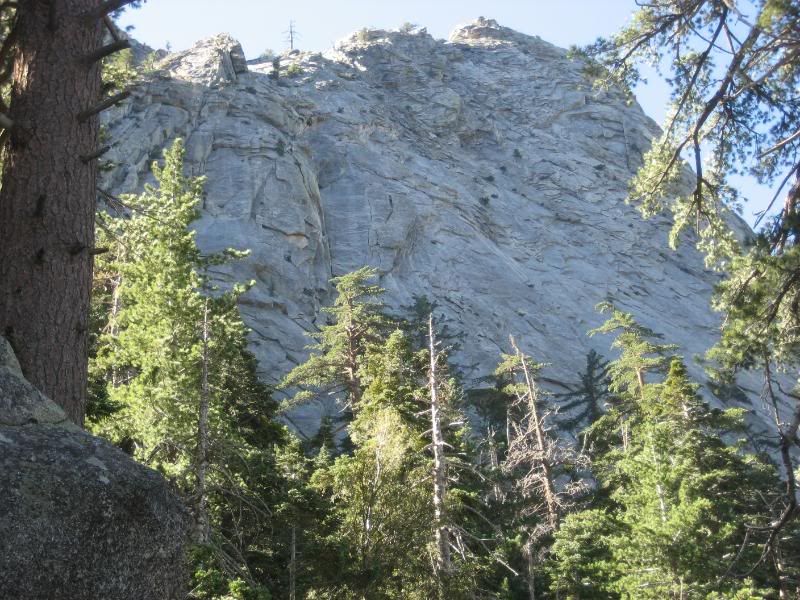
The day started early for both of us, as we left our home bases fairly early in the morning and met in the town of Idyllwild around 9:30 AM for a planned day of multi pitch rock climbing session on the famous local rock. After doing some research and taken into account my relatively short rock climbing experience (I might as well mention that I am afraid of heights.) we decided to look for climbs in the 5.3 to 5.6 range, and rating typically describing a climb adequate but challenging enough for beginner to intermediate rock climber. This was a first time climbing the rock for both of us. I must say that the rock sits in a forest area that has breath taking views from all angles. At the base from where you start your climbs, you are already standing above elevations of 7,000 feet. You can see as far as your eyes can see to the West, and North, to the east, your view is blocked by a towering San Jacinto mountain range, covered with huge pine trees.

Warm Sunny Day at Tahquitz Rock

Also, the cool and sunny morning day turned into a perfect and mild 72 degree weather day, and stayed completely sunny. Sunny and warm enough to shed some layers of clothes and soak in the sun rays while we prepared our gear for the climb.

After some consideration we made it over the West facing side of the rock and did a 2 pitch climb on a fun, but challenging route.


Being that we don’t climb with enough frequency, we took extra time to review and go over climbing fundamentals, things like rope management, the important rope knot styles, setting safeties, belaying and communication, and securing one self to the rock where you prepare to proceed with the second pitch. A pitch is a section of a cliff that is climbed between two belay points (where one climbing partner is providing support and safety for the other as he/she climbs.) The length of a pitch is determined usually by a variety of factors, including a good belay ledge, rope drag, solid rock, and the length of rope. Pitches are never longer than the length of a climbing rope, which is either 165 feet or 200 feet. Most pitches on long climbs are between 100 and 160 feet long. Here is Kevin, going over the climb details on the reference book.

Kevin double checking the climb


I always find it easier to climb up the rock than go down, and besides being more difficult to come down a rock, I also have to learn to control my fear of heights, something you don’t get hung up on, while you are going up the rock because your are too focused on finding a way to climb up the rock and have little need to look down. That is why I focus on the rock sections closest to me, and what is above, and avoid having to look down from where I am on the rock. The goal is to keep moving cautiously. “Cautious but keep moving” I tell myself.


All in all it was a great day spent outside doing an activity outdoors we both enjoy, and agreed that we need to plan a couple more rock climbing days in the near future. Since the season is changing and things will only get colder and the mountain will soon get it’s first snow in the weeks to come, those climbing sessions will probably occur in Joshua Tree, another rock climber’s paradise, not too far from home.

Sunday, July 26, 2009

Big Sur Camping - Prewitt Ridge

There are few places that embody the beauty of California’s Coast as Big Sur. Having spent some years living on the Central Coast, it has always held a special place for me, due to the geographic beauty and ruggedness as the stretch of coast between Carmel and Cambria.

I visit Big Sur, to spend time in nature, either surfing, hiking or camping. There are several campgrounds on the coast, including Pfeiffer State Park, Kirk Creek, and Plaskett Creek to name a few. These campgrounds provide a close experience to the coast, are developed with pit toilets and running water. The problem is that in summer, the high travel season thru Big Sur, the camp grounds are filled well in advance, and thus requires planning which can kill the spontaneity of loading up the car, heading north and expecting to find a place to camp for the night.


However, if you are into back country adventures, and do not mind primitive camping, there are several campgrounds found deep in Los Padres National Forest, that are available on a first come first serve basis.

These campgrounds are less accessible National forest campgrounds nestled along remote dirt roads at higher elevations in Big Sur. As one would guess, the tip of the Big Sur mountains offer even more picturesque panoramas of the coast, compared to being along Highway 1. During my visit to the Central Coast this summer, I planned to do at least one day of back country driving and camping high on top of Big Sur. I monitored the weather channel for a day forecasted to be sunny, and on a short notice I loaded up the Land Cruiser with camping gear, food, and my surfboard of course, in case I would find some waves at Sand Dollar Beach (that was not to be during this trip.)

After doing some research on the internet, I focused on Prewitt Ridge campground as my destination, and after analyzing the maps and other data, I decided to make the drive up the mountain via the Willow Creek road, road 23SO1 (aka Los Burros Road.) Driving to the campground thru this route, guaranteed me more back roads driving vs. approaching the campground from Nacimiento-Ferguson Road. Los Burros Road, will intersect South Coast Ridge Road, which is the road that will take you to Prewitt Ridge Campground.


If you decide to make this trip, I highly recommend having a detailed map of the area. A GPS would also come in handy here, as there are many side dirt roads through out that can make navigating the area a bit confusing. You do not want to go down one such road and finding out that it is closed at a private property gate for example.

Also, while 4 wheel drive is not necessary, do be aware that the roads are narrow, and require paying close attention most of the way. Some parts that wind through the mountain forest are lined with brush and oak trees, and redwoods so thick, creating canopies that you can loose your satellite reception many times. Keep an eye for the seldom vehicle you are likely to see, especially when driving around curves. Not to alarm you, but driving off the road in some places you may as well have your will in order, as such a fall would likely result in an early life departure.

Along South Coast Ridge Road, there are a number of marked and mostly unmarked camping sites. At an elevation 3300 feet, Prewitt Ridge gives you about 180 degrees of unparalleled Pacific views, minus the crowds. I ended up sharing the campground with just one couple, whose tent set up was far from mine.


I was blown away with the beauty of the place, but did find the local bugs (flies and hornets) quite annoying during my stay, The only negative experience of a truly great day. Big Sur is God’s country and exploring the back roads high on top of the mountains, provides one with yet another alternative to enjoy its wild beauty.


For more pics cut and paste the following link into a new screen.

http://smg.photobucket.com/albums/v228/bohemianjsr/53%20Big%20Sur%2009/?albumview=slideshow

Wednesday, June 17, 2009

What is an expedition vehicle?

An expedition vehicle is a 4 wheel drive vehicle set up for self reliant travel in the back country, while covering long distances over variable terrain. As mentioned before, driving a reliable vehicle is first and most important, followed by having done the necessary preventive maintenance services as suggested by the manufacturer being a close second. As time and budgets allow, you will also contemplate adding modifications (mods) to prepare and customize your vehicle for the adventures your vehicle is likely take you on. In no particular order, the most important areas to consider are stated bellow.


Better Suspension and Tires


You more than likely need to have an aggressive tire that does the job on highway, while at the same time off road, and that comes with some of the traction and durability features that an All Terrain or Mud Terrain tire usually does. You are not looking for the biggest tire, you are looking for a tire size close to stock, and which size is easily replaced south of the border if need be. Try finding a size 35” tire in Baja, good luck finding one at a llantera. Make sure you also carry a full size spare tire. I am currently running a 295/75/16 Nitto Terra Grappler AT which equals to 34 inches roughly.

Lifts should also be kept to a minimum, 2 “ – 3” is a good bet, for improving approach, break over and departure angles. The added clearance of a small lift, combined with the slightly bigger tire, will give you the extra clearance you may need to get over obstacles and thus avoid scraping or hitting key truck components under the truck. An Australian outfitter (OME) sells a combination of heavy duty coils and long travel shocks for a very reasonable price. It is also surprisingly easy to do one self, it was one of the first things I did to my vehicle, which is adding a 3” suspension lift by replacing the coil springs. Actually I helped my friend Jessie do the install and learned a lot myself that day. Adding the lift along with the long travel shocks took only a couple of hours.


Engine

Engine and drive train should be kept stock. There is no benefit to "high performance" exhausts or other engine components that can complicate things during routine maintenance or repairs. If you are mechanically inclined, you want to be able to tear down the engine in the field if necessary, and don't need anything that'll cause the engine to operate outside of OEM parameters. Adding a second battery in the engine bay is a popular modification on expedition vehicles. The benefits is that you reduce the possibility of getting stranded in the middle of nowhere because of a dead battery. By having a 2nd battery, you can flip a switch, which by passes the dead battery and start right up.

Armor Protection

Having a heavy duty bumper that can take a substantial impact force from a moving object is also a good idea. You also need to consider adding body armor to protect areas like body panels which can be very costly repair, and thus a pair of rock sliders can go a long way to adding protection to the vehicle’s body panels while at the same time, provide places to lift from with your high lift jack. Adding a skid plate is also a good idea, you don’t want to crack your center differential by accident when going over rocks. That would not be good. I replaced the land cruiser’s front bumper with a winch ready ARB front bull bar, and added a center differential skid plate, along with bolt on rock sliders.


Storage Capacity


At some point you will have to consider how you are going to load up and haul your equipment and gear safely and securely. You will have to determine the best way to carry your camping equipment, recovery gear, tools, and key things like extra fuel and water. One popular way of adding capacity to your vehicle is by adding a qualify roof rack where you store items best suited to be carried outside the vehicle. By securing things properly on top of the roof rack, you can haul, your extra fuel and water for example in military style jerry cans, and bulky but light equipment like sleeping bags and tents, in addition to surf boards, wood, etc. My truck is equipped with a Conferr 4’ x 6’ full size rack, mated with a tough, durable poultry flooring for the floor board. I added mounting tabs so I can mount the highlift jack on the side of the roof rack, in addition to the shovel.


With the help of my buddy Marc, we also created a low cost but efficient storage system where I carry a list of tools, spare parts, and recovery gear, hidden from the naked eye.


Lights and Electrical Accessories


Good driving lights are an absolute must. Good headlights, and a couple of off road lights in the front, will come in handy during night time adventures. Also adding a couple of lights to the back is another good idea when setting up base camp at night and to help you see more when backing up out of tough situations.
I went along and added a pair of the Kragen 7" HID Off Road lights to the ARB bumper. Easy install. Great light pattern and can't beat the price over the name brand HIDs, in spite of being made in China, the perceived quality is satisfactory, and the feed back has been positive from other users so far. I had the chance to try them out thru a couple of Joshua Tree's Berdoo Canyon night runs. I am very satisfied so far.


The stock incandescent light bulbs in the doors and interior get hot and draw quite a bit of current. This poses a risk of draining out the battery if someone leaves doors ajar while camping in a remote location. LED lights draw a fraction of current compared to incandescent lights and can be sourced pretty inexpensively over the internet.

One of 80 series shortcomings is the fact that it only comes with qty 1,12v receptacle. Not nearly enough to power the many electronics one may be using at a time: GPS, laptop, CB Radio etc. etc. Therefore adding more is a must.


Emergency and Recovery Gear

The items here are all critical and should be well thought out according to your vehicle and needs. Having the ability to increase the air pressure in your tires, after airing down when going off payment is important. I carry an inexpensive 12v power air compressor with enough ump to power up my tires within a reasonable amount of time. Make sure you have a good working fire extinguisher, along with a set of recovery gear items like a highlift jack, tree strap, chains, shackles, tow strap, a shovel, even an ax. You never know when you may need them, usually at the most inconvenient time. Extra engine and gear oil, along with a descent list of hand tools and wrenches is also important. It is also a good idea to having a list of spare parts like drive belts, along with cooling system hoses. Having the manufacturer’s repair manual is also a good idea.

Navigation and Communication

Know how to use a map and compass. Know how to operate a GPS as it is an invaluable tool for identifying your location at any given time. Have paper maps of the places you are going to visit. My vehicle is set up with a laptop mount so I can mount my lap top and sync it with my Garmin Etrex Vista gps for assisting me in planning my routes, as well as providing live navigation information on a large computer screen. It is something I recently have been exploring, and it came real handy during my last trip thru north Baja.


I also carry a portable CB radio with temporary mount CB antenna when riding along in a group, as it is a requirement to be able to communicate with others during back country adventures.

Additional Modifications

Diff & Gearbox breather extension
The Toyota differential breather hoses terminate too low on the body frame to provide enough protection during water crossings, which can lead to water and gear oil mixing up in your differentials, thus requiring draining and refilling of your differential gear oil after wards, as you do not want to be driving with water in your differentials for long periods of time. An easy modification can be done to resolve this by buying a few dollars worth of ID fuel line, some clamps and extending the differential breather hoses at a higher location inside the engine bay. Again, this is a required, cheap modification if you plan on doing the occasional creek and river water crossings during your back country adventures.


Extra Length Stainless Steel brake lines

Having longer travel shocks with the 3" suspension can cause the stock brake line to snap during full articulation. That would ruin any trail run. Longer brake lines address this issue.


Tire Carrier modified to the OEM rear bumper
I borrowed from a design off the internet to have a local fabricator build me a custom tire carrier that swings, and that fits on the existing rear bumper. It is a much more convenient way of carrying your spare tire, as having the spare tire in its original location under the rear of the land cruiser robs you of clearance, and increases the likelihood of puncturing your spare when going over rock obstacles.


Here you can see the carrier and the SUV canopy set up. the SUV canopy is a great camping accessory as it provides much needed shade out in the desert or at the beach.


Limb risers

The odd looking cables running from the front bumper to the roof rack are meant to divert large overgrown tree branches and shrubs off the vehicle’s windshield, and thus avoiding breakage. It is a very camel trophy thing to do, and a popular modification for expedition vehicles.


Security Alarm with a hidden kill switch

This is almost a must when traveling in Mexico. A descent alarm coupled with a hidden starter kill switch is a good theft prevention and deterrent. You don’t want to leave your vehicle unattended when going to a good local restaurant and being surprised that your vehicle was stolen. A kill switch and alarm adds extra piece of mind.

Future mods
Future mods will include a snorkel to minimize the effect of dust on the engine (reliability.) I also plan on adding an automatic rear locker (improved traction,) a winch (recovery,) adding dual batteries (recovery) and finish the list with a 12v fridge, so I never have to worry about keeping things cold or dealing with soggy food.

Friday, June 12, 2009

My Expedition Vehicle: La Mula

The summer and fall of 2006 were very, tough times for me in many ways. I was diagnosed with a serious health issue, that I will talk about in other posts, and my current vehicle which I was driving at the time, a 99 Jeep Grand Cherokee had just suffered its 2nd major engine failure within a matter of months, and I was determined to get something more reliable but still look for a 4 wheel drive SUV.

I am a fan of suvs and trucks because they have been very useful for me in the past. I've been taking my suvs off pavement primarily for surf trips down to baja. I've had other 4 wheel drive suvs, including an early 90s pathfinder, and a mid 90s s10 blazer. in the early 90s, my buddy Marc and I drove 2 wheel drive Nissan truck thru Baja and then over to Mainland Mexico in a 5-6 week surf trip. The truck was loaded to the gills with camping equipment, and 6 boards secured on man made surf racks that my buddy made from 2x4 pieces of wood. That trip was a blast.

I figured that while I battled my health issues, I was going to distract myself in healthy ways, and some of that required trips to the outdoors, where I could be close to nature and do the things that I enjoyed doing: camping, going on hikes, take trips to the beach, surfing, etc. etc.

I looked closely into a Land Rover Discovery but after doing some research I concluded that as much as the Discovery II is a sexy, sophisticated SUV, it would likely come at an additional expense, as they have a reputation for not being the most reliable vehicles.

At the same time, I have always admired the tough, and rugged looks of the Toyota Land Cruisers. More research on the internet also indicated to me, that the Land Cruiser drivers are very loyal owners and tend to love the brand's reputation for go anywhere, tough as nails reliability. I also learned that out of the box, the Toyota Land Cruiser is one of the most capable off road vehicles available, and can take you to most places that one is willing to go. And with very little additional modifications, one can turn a stock land cruiser into a vehicle that is prepared to tackle the most rugged terrain anywhere in the world. For these reasons, the Land Cruiser vehicles have legendary status in countries and continents with some of the most inhospitable terrain: Africa, South America, Middle East, and Asia.

Now the only thing I needed to do was start the search, and sell the Jeep. After having taking a look at a few 80 series Toyota Land Cruisers, and having little luck in selling the Jeep to a private buyer, my best solution was to negotiate a trade in, with a dealership in the San Fernando Valley, who focuses on selling late model German, and Japanese vehicles.

The dealer had 2 clean, stock 80 series Land Cruisers on the car lot, and after careful consideration between the both, I decided on "La Mula," for being in slightly better shape cosmetically, and having a clean leather interior, as well as having lower mileage.

I had an independent mechanic do an inspection, where compression was checked, and passed with flying colors. The Carfax report told a story that the vehicle had belonged to 2 previous owners, and had no previous accidents to speak off. We were good.

Like a student of a certain trade, I poured time in the most resourceful internet forum for Toyota Land Cruisers, where members provide advice, and share free information on everything land cruiser. I found out that the inline 6 motor is surprisingly easy to work on, as well as the Land Cruiser platform overall, and there were plenty of do it yourself (DYI) threads on how to go about doing the preventive maintenance, and modifications for every type of terrain that one would like to tackle: from easy dirt trails, to Rubicon style, extreme terrain.

This was also positive news, as I made a commitment that I will try to do most of the preventive maintenance myself, or with the help of friends, and only take my car to a mechanic when it is most necessary. Besides saving oneself hundreds if not thousands of dollars in repairs by doing the work yourself, the other key benefit is that you become closely familiar with the mechanics and nuisances of your truck, something that can prove really valuable in case you need to do some emergency repairs during a back country adventure run, where you could be miles away from the nearest vehicle, let alone a mechanic.

Thursday, May 7, 2009

Intro

For some time now, I wanted to create a blog where I can write about my interests and life trials and tribulations, and at the same time, record some of the more memorable adventures that I have previously embarked on, and those that I’ve yet to experience.

I am in my late 30s, a man who has always enjoyed spending time outside and in nature, either playing sports like soccer, and baseball, or surfing, one of my life passions that I still enjoy doing today, whenever I get the chance. I try to stay physically active, and in shape, by eating right, and going back to the gym whenever my body starts suggesting that it is time to go back. LOL.

I’ve had the opportunity to travel to many countries mostly for work, but also for pleasure. The majority of international travel has been in the Americas, and I have been to Canada, Puerto Rico, Dominican Republic, my native country: Mexico, and many of its states, Costa Rica, EL Salvador, Panama, Venezuela, Colombia, Peru, Chile, Argentina, and Brazil. I have also been to many states in the Continental US.

Some of my favorite places to visit include and in no particular order: Baja, anywhere along Mexico’s Pacific Coast, Central California, west of hwy 101.

My philosophy has been that adventure and exploration does not have to involve getting on a place and crossing time zones, but rather it is a state of mind, and all it takes sometimes is a vehicle with enough versatility to get you to places off the beaten path.

For me that vehicle happens to be an expedition modified, 4WD 1997 Toyota, Land Cruiser, affectionately nick named “La Mula” (the mule.)